OpenVPN Windows Service Foo (Updated)
As a longtime OpenVPN user on Linux I thought it would be an easy task to set up OpenVPN as a service on Windows. Well, I was right… and couldn’t be wronger. Setting up the service is part of the installation notes for OpenVPN. Just search for “Running OpenVPN as a Windows Service” in the notes and you will find a pretty good description that should get you up and running in no time.
But the devil is of course in the detail. This kind of setup works perfect for servers, or in general for machines with good internet connectivity that never go into standby or hibernation. Once you use a laptop, which you usually put into standby on a regular basis, or you simply have a sluggish WiFi connection, then you have a problem. And the problem is, that OpenVPN is unable to re-establish the tunnels and, at least in my case, causes quite some CPU load on the machine. The problem is actually well known to the OpenVPN team (see here and here).
So what are your options to fix it. In OpenVPN’s people suggest to use either OpenVPN Service for Windows or NSSM. I tried my best with the OpenVPN Service for Windows, but I couldn’t get it to work. So sorry guys, I can’t recommend that one. Then I tried NSSM and hit similar hurdles but the documentation was better and I could get it actually to work.
So without further ado, I present to you the setup of OpenVPN as a service in Windows using NSSM.
For starters you have to download and install the latest version of OpenVPN (Download) and NSSM (Download). NSSM does not come with an installer. That means, you have to create a folder for instance in your “Program Files” directory (or whatever directory name %PROGRAMFILES% represents). And then, depending on your operating system, you copy the win32 or win64 version of nssm.exe into that directory. Now open a console with adminstrator rights and navigate to the newly created folder and you can try to execute NSSM to get the command line parameters:
C:\Program Files\NSSM>nssm.exe

NSSM: The non-sucking service manager

Version 2.24 64-bit, 2014-08-31

Usage: nssm
To show service installation GUI:
nssm install [<servicename>]
To install a service without confirmation:
nssm install <servicename> <app> [<args> …]
To show service editing GUI:
nssm edit <servicename>
To retrieve or edit service parameters directly:
nssm get <servicename> <parameter> [<subparameter>]
nssm set <servicename> <parameter> [<subparameter>]
nssm reset <servicename> <parameter> [<subparameter>]
To show service removal GUI:
nssm remove [<servicename>]
To remove a service without confirmation:
nssm remove <servicename> confirm
To manage a service:
nssm start <servicename>
nssm stop <servicename>
nssm restart <servicename>
nssm status <servicename>
nssm rotate <servicename>
C:\Program Files\NSSM>
You can control NSSM completely from the command line, but it also has an actually usable GUI. You can start the installation process by doing the following
nssm install
or if you want to give already a service name (can’t be changed with NSSM once it is installed!). Note that if you have multiple tunnels, then you have to setup multiple services. So give it a meaningful name.
nssm install "My OpenVPN Service"
The second command should give you the following window:
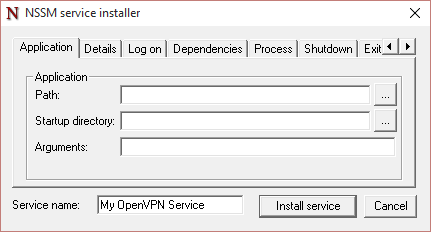
The next step is filling in all the information necessary for NSSM to set up OpenVPN as a service.
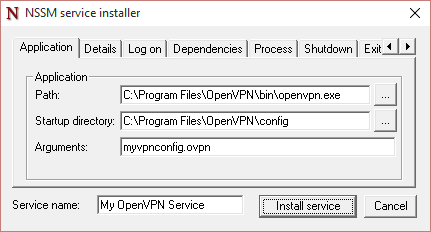
Application
Path: This is the path to the OpenVPN binary and should usually be C:\Program Files\OpenVPN\bin\openvpn.exe.
Startup directory: This is the path to the directory where you store your OpenVPN configuration files. Usually that is C:\Program Files\OpenVPN\config. But if you want to run the OpenVPN UI with manual started tunnels in parallel, then you should create a separate folder, e.g. C:\Program Files\OpenVPN\config-nssm. Otherwise it is easy to confuse manual tunnels with service tunnels. In my sample I won’t use manual tunnels, so I go with the default.
Arguments: This is the configuration file for the tunnel, that should reside in the above defined startup directory.
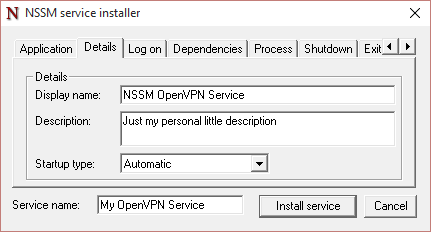
Details
Display name: This is the name that is basically visible everywhere. Most of the time this is the same as the service name, but this is up to you.
Description: As the name says, this is a description, that can be viewed later on in the services area.
Startup type: This is the standard service startup type setting for a windows. Most likely you want to choose Automatic here. But you have the choice between Automatic, Automatic (Delayed Start), Manual and Disabled here.
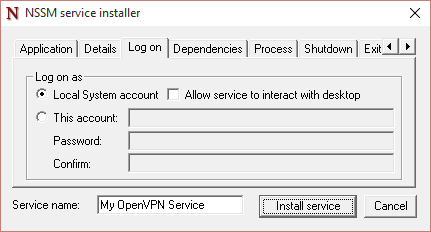
Log on
Here you can define as who this service needs to run, but unless you are doing something very special here you can leave it to the default setting (Local System Account).
Update
Running Windows 10, this tab can be more important. Using the system account you will be able to install the service, but when starting the service, you might see an error. In the event log it will show up with the following message:
Program C:\Program Files\OpenVPN\bin\openvpn.exe for service OpenVPN siteopsvpn (NSSM) exited with return code 3221225794.
This basically means, that you use an account that has no rights to execute OpenVPN. I solved it, by running the service as a user, that has administrative rights on that machine. You can even create a special user to do that.
Dependencies
The dependencies tab is important, because here we have to add the services that OpenVPN is depending on (Dhcp and tap0901).

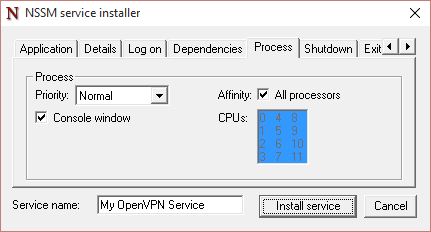
Process
In this tab you can control how the service is handled by the processor. For instance if it should only run on a specific processor or a higher priority. For the normal use case this can be left alone.
Shutdown
Unless you run into strange problems you can leave this one alone.

Exit actions
This is again a tab that you don’t have to touch under normal circumstances.

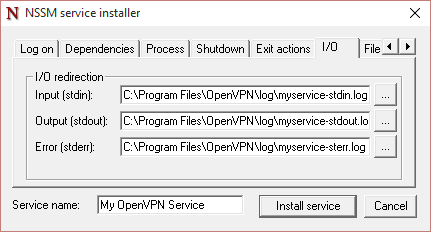
I/O
Now we have to do something again. With the OpenVPN UI you have the ability to take a look at log files. Well, with services you don’t, unless you define them here. You can use the same for all redirections, but I prefer to have a separate log for stdin, stdout and stderr. Log files are usually located in C:\Program Files\OpenVPN\log.
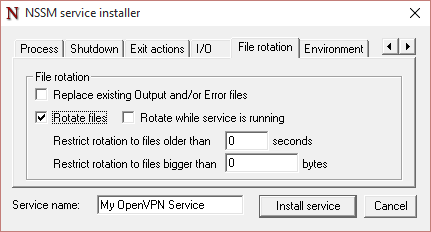
File rotation
This tab is an extension of the I/O tab, as it configures the log rotation. I set it to rotate and left the rest alone. But you can decide on different rotation strategies, so that the files don’t get too big, too old, or whatever the problem might be.
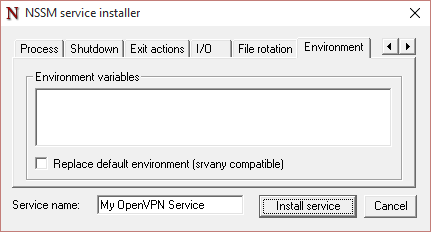
Environment
This last tab can be ignored for the usual use case. But you might have a special case where you have to add or even replace the environment, then this tab is your friend.
Now a last chance to think about the service name… You are good? Okay, then click “Install Service” and NSSM will install OpenVPN as a service that can survive standby and sluggish network connections. You have to start the newly create service with either the net command, the nssm command or via the services in the control panel.
If you have to change anything you can do that by calling NSSM with the edit parameter.
nssm edit "My OpenVPN Service"
And, as mention before, you can do all this on the command line. Here is the sequence.
nssm install "My OpenVPN Service" C:\Program Files\OpenVPN\bin\openvpn.exe

nssm set "My OpenVPN Service" AppDirectory "C:\Program Files\OpenVPN\config"

nssm set "My OpenVPN Service" AppParameters myvpnconfig.ovpn

nssm set "My OpenVPN Service" AppStdin "C:\Program Files\OpenVPN\log\myservice-stdin.log"

nssm set "My OpenVPN Service" AppStdout "C:\Program Files\OpenVPN\log\myservice-stdout.log"

nssm set "My OpenVPN Service" AppStderr "C:\Program Files\OpenVPN\log\myservice-sterr.log"

nssm set "My OpenVPN Service" AppRotateFiles 1

nssm set "My OpenVPN Service" DependOnService Dhcp tap0901
Happy tunneling.